The Stacy Chronicles

Smile! You’re at the best WordPress.com site ever


2 Comments

Pumpkins and Wreaths

I had a ‘girl’s weekend’ this weekend and I knew I wanted to do 2 fall crafts.  This is my favorite time of year!  I think it’s because growing up in Florida we never had a fall.  I love living in this part of Alabama because we get to have all 4 seasons.  I’m doing a ‘Knock off’ of sorts from Myra at http://myblessedlife.net

First we made pumpkins.  It’s just a square of fabric inside out, stitched and then you draw up on one end.  Flip right side out, put a cup full of beans or rice in.  Stuff with old rags, wal-mart bags, cotton, etc.  Stitch the top up and pull tight.  Hot glue a stick in the top and your are done.  Easiest project ever!  You can add embellishments, I haven’t had time, but I think I’ll add a burlap leaf or something.  She gives you a lot better tutorial here: http://myblessedlife.net/2012/09/fabric-pumpkins.html

These are Julianna’s.

Next I did a ‘Knock Off’ of her Burlap and Lace wreath.  You can find that tutorial here: http://myblessedlife.net/2012/07/burlap-and-lace-wreath.html

  • Buy a straw wreath or any other wreath form.  These were $4.99 at Hobby Lobby
  • You’ll need about a yard or so of burlap.
  • Cut it into a wide strip, maybe I should have done this about 3 inches wide… I did have to use 3 strips at this width.
  • Add some hot glue to a section under the wreath and start wrapping your burlap.

It should look like this minus the lace when you are done wrapping.  I like the addition of lace to kinda ‘fancy up’ the burlap.  You can omit the lace if you’d like.

Next you need some embellishments.  We made flowers.

This wreath is Jennifer and Julianna’s.  Their home is a country Americana theme, so they kept that going with their wreath.  They opted not to use lace and instead wrapped part of their wreath with this navy w/white tiny dot fabric.  This is a felt flower that I made.  It’s just 6 large and 6 small petals cut out of felt.  You dab some hot glue at the base of each petal and pinch it together.  Cut a circle of felt and glue the larger petals down, then the smaller on top.  Lastly you glue a button on top.

These are my rosettes!  I used burlap, lace, polkadot, and chevron patterns.

Now for the finished project:

I’m not sure if I need to add anything else to it.  It feels simplistic, rustic, and a little girly.  I think I like it this way.

So there you have it folks, my fall wreath!

Here is my Halloween wreath from last year. http://wp.me/p2Jg1q-14


Leave a comment

Harvest Salad

I was craving a ‘fresh’ crisp salad last night and two of my favorite people were coming for supper.   What better reason does a girl need to  make  a new salad?

I hate taking pictures of each step.  Maybe one day I’ll get over it so you can see everything I do step by step (anyone remember that from TGIF?)  Okay, here is the finished product, but I will still tell you what’s in it and what I did.

Isn’t it pretty?  It was so yummy!  Here is what I did:

  • first marinate your chicken strips (I just soaked them for a couple hours in Dales)
  • make your sugar coated pecans.  preheat oven to 300.  you need 1/2 lbs of shelled pecans.  mix one egg white with 1 1/2 TBS of water.  next get a ziplock bag and add 1/2 cup sugar, shake or two of salt, and a TBS of cinnamon.  coat pecans in egg mixture, use slotted spoon to transfer into ziplock.  shake, shake, shake, shake, shake, shake, shake your pecans, shake your pecans.  then lay them out on a cookie sheet covered in tin foil.  bake for 40 or so minutes, make sure to stir them around every 15 minutes.
  • start grilling your chicken.
  • finely slice your apple (i used 1  honeycrisp apple, it was so good)
  • chop up about a 1/2 cup of green grapes.  just cut them in half.
  • mix your baby spinach, with your grapes and apples.
  • sprinkle some mozzarella (or omit the cheese)
  • top it off with your pecans and chicken.
  • you can toss the greens before hand with balsamic vinaigrette or just drizzle afterwards.  (i love Ken’s balsamic vinaigrette)

There you have it!  A yummy autumn/harvest/crunchy/very healthy salad!

enjoy!


Leave a comment

Birthday Happenings

Jeff’s birthday was a week ago, but we were just now able to go out with some of our friends.  It’s really hard nowadays to fit everyone’s schedule.  Luckily two of our favorite couples we able to go to diner with us.

We ate in Birmingham at the Tavern.

It was really dark in there and the lights created awful shadows on our faces.  The waiter was kind enough to take this picture.

The food was decent, though we’ll probably never eat there again.  They charged $3 for bread, and tacked on a 18% gratuity, (I thought that usually applied to parties of 8)?  Anyways, it was a big portion…I just got through eating the leftovers, which fed us both!

After the Tavern we went to Flip Burger Boutique (oxymoron?) to try their Krispy Kreme shake.  My boy loves his Krispy Kreme!


I got a Nutella Shake with Burnt Marshmallows.  It was actually yummy but had a propane type flavor…

Another shot of the Krispy Kreme, it was smokin’, but I didn’t capture it quick enough.  They freeze the shakes with liquid nitrogen, or something like that.

Here are a couple of shots in the restaurant.  It was pretty cool.  I felt like I was in a spaceship in an 80’s music video…

My camera amazes me.  I wasn’t even aware it was focusing on the lone cup past the three.

My baby bro and his super cute and sweet wife.  (We have so much fun hanging out with them)

After dessert we went back to their dorm (they are both in school at UAB) and played cards and chatted the night away.


Love her.

So that was our little birthday fun for Jeffrey.


Leave a comment

Panda Baby

I love to knit and I love to crochet.  I just love to create.  I taught myself about 7 years ago how to knit.  Money was tight and I wanted to make homemade gifts for my family.  I’m not the best and I steer away from super complicated patterns.  I think my favorite things to make are animals.  There are so many little tiny parts and you have to stuff them and sew them on, then give them a face.  I just love it!  I always find free patterns online.  There are so many free patterns online that I don’t even look at patterns that are not.  I stay busy just making the free ones!  Here is a link to this one.  It’s a beginner pattern and super easy. http://www.lionbrand.com/patterns/80446AD.html

I crocheted a little bow that I super glued onto an alligator clip so it can be a baby girl panda or…

a baby boy panda!

Here is a sneak peak of something else I’ve been working on.

Have you found any easy toy patterns?  If so please share!


Leave a comment

Yummy Guacamole Dip

I’ve never done a food post.  I do really love to cook.  I will love it even more when my kitchen is finished and I have my dishwasher installed.  I HATE cleaning up after cooking.  I guess that is why I don’t cook too much.

We eat a lot of chips and dip around here.  Salsa and tortilla, spinach and bread, ruffles and french onion, etc.  One thing you should know is I like to experiment and I never measure.  I just kinda get in there and create.  I bought a couple of avocados and some pita chips.  I thought I’d make a dip.  Here goes…

This is everything I put in it.

  • 2 avocados
  • around 2 tablespoons of vidalia (sp?) onion
  • 1/2 a cup of sour cream
  • a large squirt of chipotle mayo
  • random pepper chopped really small (omit seeds for less heat)
  • sprinkle of garlic powder
  • salt and pepper to taste
  • multiple squeezes of lime juice
  • you can use pita chips or any chips for that matter

It ended up tasting pretty good.  Jeff loved it.  Nice and creamy with a little heat!

Have you invented any dips lately?


Leave a comment

Simple Lamp Shade Revamp

I LOVE vintage anything.  My mom got me this super cute vintage lamp, probably because it has a poodle on it.  I’ve had it for a while, and I’ve never been able to find a shade I like for it.  The base is a cream color and I already had a small white shade, but it didn’t look right.  A super easy way to add vintage charm is to glue lace on your shade.  Here are the pictures.

Here is the ugly little beat up lamp shade.

Start at the seam and add glue, then start wrapping until you make your way back around to the start.  You can use hot glue.  I used a strong craft glue that dries clear…it started out clear too.  Sorry I didn’t take a picture of the glue.  I also used a clothes pin to hold the start of my lace.  In this project I used two types of lace that I had cut at Hobby Lobby.  I got 2 yards of each, it was less than $3 total.  I also bought some lace on the roll for $2.99 (I should have waited until it was on sale).  I alternated the lace each row.  When you get back around to the start of your lace, just cut it off, fold it under, and glue it down.

Here’s a picture of the ribbon.  I noticed that the lace bumped up and didn’t wrap around the lamp shade smoothly (probably because it’s a circle), but the ribbon stayed smooth and held everything down very well.  It’s lace, so I wanted it kinda ruffly anyways.

Here it is with the light off.  Even though the lace is white and the bottom is cream.  I still think it looks good.  Plus…

with the light on it looks cream anyways.

I love it in black and white:

So, pretty easy if you are into the shabby chic / vintage look.  I have to replace the fabric on our bedroom lamp next and it’s going to be a lot harder, and it involves an iron…bubum baaaa!!!!

Have ya’ll done any easy revamps lately?


2 Comments

The Long Awaited Shed

We have been in desperate need of a shed for almost 2 years… so since we’ve moved in.  We have desperately needed some storage space.  <<we are obviously pretty desperate, huh?  When we insulated and floored the attic that helped a lot, BUT we still have “manly” things that need to be put away.  Since we have to have all paint, tools, extra pieces of lumber, and so on locked up for our homestudy, we decided to go ahead and clean out our savings  buy a shed.  This is totally 100% embarrassing, but part of the ‘reality’ in “ramblings, renovations, reality” is being REAL.  Even though we don’t like to believe it is ‘real’ this is for REAL what our back room has looked like since we started all the renovating.  Keep in mind, NO storage space but this room.  What is this “room” you speak of anyways?  Well, it’s a glorified junk room right now, but future plans include: making it into our laundry, craft, and homeschooling room.  It’s basically going to be a mudroom where you can take your shoes off and hang your stuff up, but it’s so big (200+ square feet) I can do all of my crafts, laundry, and homeschooling in here.  I think it is going to be my favorite room in the house and where I spend most of my time, when we are done.  I’m pretty sure I want it all white.  Ceiling, trim, walls, all of it white.  If you know me, you know I LOVE color.  My train of thought is this, we will have  the kids painting, crafts, and schooling stuff hanging all in here, which equals a lot of color.  I figured if I made it all white then their art work can shine.  The mudroom is opened into the kitchen, so we are going to tile the whole area the same to create flow.  We are thinking a gray color with dark grout.  Perfect for muddy feet and paws.  Here is what our glorious mudroom looks like as of today:

Go ahead and say it, YIKES!!!  Yeah, we know.  Haha.  Look at those floors!  Well, when we moved it there was cream carpet in here.  As you can imagine with us using this door all the time (it’s our main entrance) it got gross.  When we pulled it up there was VCT (vinyl composite tile) down, with leftover carpet padding.  We were going to pull it up (it’s peel and stick tile) BUT back in the day the adhesive they laid these suckers with had asbestos in them.  That means we can only tile over it.  Since this room was our storage room, we had nowhere to  put the junk so we could tile.  But NOW…

Here she comes!

He’s so happy!

We have to trim our massive pecan limbs.

We also plan to build something around all those cinder blocks to make it look nicer.  For all of you out there wondering… no, storage sheds are not cheap.  We had originally planned on buying the supplies and building our own.  There’s a tiny problem with that…we’ve never built a building before!  I think you have to have a building permit too.  Also, time is of the essence, since we are trying to pass a homestudy here!  It would take us a really long time, not to mention having to level the building and put a roof on it, etc, etc.  We went with a local company and they brought it out and leveled it for us.  Tomorrow we will start filling it up.  So, we feel it was totally worth the money to save all that time and effort.

Here’s Keira-bug inspecting the shed.

I decided to keep all the graininess in this photo (it was getting really dark) because I just liked it that way.  I think Keira approves; she thinks it’s her new play/dog house!

How about ya’ll?  Any storage spaces at  your home?  Do you think you could build your own shed?


7 Comments

Toddler Room

Okay, so what I think is going to happen as far as our room arrangements in the Stacy household is: if we get a baby we will put a crib in our bedroom, if we get toddler’s they will go in the nursery, and then we have a guest bedroom which will end up being the “boy room”.  Eventually when we get settled and have adopted or bio babies we will have a boy and girl room.  For now it is just easier to put both the “toddlers” in the same room (the girl room).  This is assuming we get two toddlers.  It will be ready for two, but if we get one toddler and a baby, the baby will be in our room.  Okay, none of that really matters.  It just tells you that there will be a lot of adjusting!  Today I’m going to show you tiny glimpses of the Toddler Room.  Currently it is a nasty pink.  It will eventually be a VERY pale aqua.  We still have to get some sheet rock work done and the ceilings textured before we can paint.  Old houses tend to have cracks around the windows and on the ceilings.  Don’t worry, it’s not structural, it’s just the old tape and plaster cracking.  The guy that usually does ours (bec/ texturing ceilings and hanging sheet rock is way beyond our DIY skills) has recently had surgery and is out for 3 more weeks.

In the toddler/girl room I’m going more for a shabby, vintage, soft look vs. the guest/boy room which will be very modern and geometrical.  Okay, here is bed #1, the girl bed.  If we get two boys we will just throw on some boyish pillows.

Two of the pillows are completed, but I need another insert to finish the last.  I placed the fabric up there so you could see it.  Sorry about the wrinkled duvet, I still haven’t found my iron. 🙂  I made two twin comforters out of an old double size down comforter.  Probably a super dumb idea because it looked like some teenie boppers had just had a massive pillow fight in our living room.   I also broke a sewing needle trying to sew through the down. 😦  Oh well, I just replaced it and kept on peddling.  I had to make covers for the comforters 1. because they didn’t look so pretty 2. because kids are going to get junk on them.  I just cut up some old white sheets I had lying around.  At the bottom of each one I sewed it together 12 inches on both sides, then I hand sewed buttons of choice for the rest of the opening.  I don’t have any white ribbon, but next time I make a run to town i’ll pick some up and then sew loops on the opposite sides of the buttons.  I’ll put up pics so you can see what I’m talking about.

Knitted bear, made by yours truly.

The pillows are made of vintage sheets and pillow cases.  Here are some shots.

I already had the pillow form, I just cut a sheet to fit it and then slipped it over.

Jeff is going to build a bookcase/bench to go under the window in the room.  I recovered a cushion to go on top.  Fabric from Ikea.

Over the past few months I’ve been collecting vintage toys to display in the bedroom over the dresser/changing table (I’ve yet to find an affordable one).  Here’s what I’ve got.

I was able to score an old suitcase at a yard sale for a dollar.  I thought it’d be a cute idea to store it under one of the beds for extra storage (toys or clothes).

Can you feel the “vibe” of the room yet?  It’s not much, but maybe it gives you a glimpse of what I’m going for!


Leave a comment

Custom Aquarium

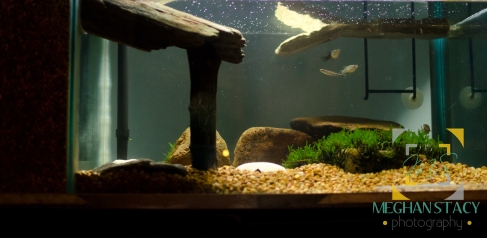
For my 26th birthday this past May, my awesome hubby caught me two tiny turtles out of King’s Lake in DeFuniak Springs, FL.  (Snape & Sulli)  Since then we have been working on the perfect little home for them.  It’s been completed for a while, but we’ve been tweaking it here and there.  We also have 6 fish that we caught out of the creek.  Let me introduce you to our little turtle habitat!

Image


3 Comments

Fearfully and Wonderfully Made

I am not going to lie.  There have been times on this journey through life, in my life where I have been very depressed.  That kind of goes hand in hand with infertility.  To this day I haven’t met a person who has struggled to conceive and hasn’t had very low moments.  It’s painful.  It puts a huge strain on your marriage.  You have to turn towards each other, not against.  The only way out of this dark pit called ‘infertility’ is to turn to God, to trust Him and his timing, and to turn to your husband.  Don’t let this barrier come in between you.  God gave you this man for richer or poor, in good times and bad.  You aren’t alone in this.  No matter how lonely you feel you have God and your husband.  Always.  Some days were worse than others.  I’d say my second and third year in this battle was probably the hardest.  There is nothing more beautiful than to read the scriptures and KNOW God cares for you.  He loves you and he will help you through the hurt and pain.  You might not get the answer you were expecting.  You might realize you are supposed to adopt or foster.  That is the most beautiful gift you can give a child.  And that child is YOUR child.  It might take 1, 3, 10 years to get pregnant, it might not ever happen, but who knows?  You could get pregnant after you adopt, it happens every day.  God’s timing is not ours.  I know you don’t want to hear that.  I didn’t either.  It’s because we are such an impatient people.  Just remember, giving birth is such a beautiful thing, BUT you don’t have to give birth to be a mother.  Just get over that thought right now!  And when you are balled up in the cold porcelain  bathtub crying your eyes out until you feel you can’t cry anymore (been there), just remember these beautiful verses from Psalms that God has given us.

 Psalm 139

7 Whither shall I go from thy spirit? or whither shall I flee from thy presence?

8 If I ascend up into heaven, thou art there: if I make my bed in hell, behold, thou art there.

9 If I take the wings of the morning, and dwell in the uttermost parts of the sea;

10 Even there shall thy hand lead me, and thy right hand shall hold me.

11 If I say, Surely the darkness shall cover me; even the night shall be light about me.

12 Yea, the darkness hideth not from thee; but the night shineth as the day: the darkness and the light are both alike to thee.

13 For thou hast possessed my reins: thou hast covered me in my mother’s womb.

14 I will praise thee; for I am fearfully and wonderfully made: marvellous are thy works; and that my soul knoweth right well.

15 My substance was not hid from thee, when I was made in secret, and curiously wrought in the lowest parts of the earth.